Showing posts with label Electric Reverse. Show all posts

Monday, 13 April 2015

Electric Reverse Testing..


Decided I wanted to test run the electric reverse before installing the final wiring. 

My first bit of wiring, love a bit of heat shrink :) 


I've run a dedicated + feed from the battery straight to the motor, the earth is pulled via the motor being fixed directly to the chassis.

There is another live feed that will come from the trigger which will be a button on the dash that will be linked to the neutral light so reverse can only be used when in neutral.


Couple of test videos..  Its a little aggressive but I guess it will be less aggressive once on the ground and with wheels on.


Monday, 23 March 2015

Propshaft & Electric reverse final fitting


I had to push the back section of the prop back onto the spline. It was very tight, I used a hammer and a bar again to push it back into place.


When fitting the nordlocks on the prop flange to the diff it pushed the heads out so far the head of the bolts not caught on the reverse mounting plate.  I had to file down the plate to give them room.


Loctite high strength applied, then tighten up.


Reverse motor fitted, used my two plates to move it further forwards. I also purchased some longer high tensile bolts.


Friday, 20 March 2015

Electric Reverse 2


Wasn't quite happy with the electric reverse. It was still too close for my liking so decided to make up another plate to push it further away from the sprocket.


It now fits must better with good clearance. 


Wednesday, 18 March 2015

Electric Reverse...


Offered up the electric reverse.. Its proper tight.. 


The adapter plate catches up on the chassis welds, so already this plate needs filing down.


The terminals are really close to the chassis, I filed them down slightly.


Something doesn't look right here. Think the diff has moved when tightening things up.


Things are far too tight here, the sprocket doesn't even move as its catching.


The prop itself is actually catching on the reverse plate, again this needs filing down.


This is close but hopefully can get away with it. (I later filed it down.)


Not happy with how close these are..


Decided to make up a plate to push the motor away from the sprocket.


It now fits much better.. Am pleased with the results..


Saturday, 7 March 2015

Pedals, brake lines, fuel lines, brake reservoir, Temp Diff fit...


First full day in the garage, started at 8:00 and didn't stop till gone 17:00... Shattered. Back kains!

Well after getting frustrated with the pedals last night I decided to do as the guys on the owners club recommended and drill out the floor so I could fit a socket in to tighten up the pedal fixings.


Here is what I was trying to do before.. You can see my problem, the scanner just wouldn't make contact with the nut


I had to file out the holes again as when bolted down the pedal box is pulled down and the original holes don't line up.


The bottom right hand lower nut if left off as this is drilled out to 10mm to run the clutch cable.


Brake cylinders fitted.


Clutch cable installed.


Clutch pedal drilled ready to fit the cable.


All fitted and in place, it works well.


Brake biased bar fitted and tightened. Brake pedal feels really nice, and doesn't even have fluid in yet. 


Onto the throttle pedal, the throttle cable only comes with the a solderless nipple so I need to get a better solution.


Pedals complete!   :)

Just need to cut down a couple of bolts and adjust things once the engine is in.


Time to finish off running the brake lines..


Lovely day.. Was even warm enough to have the garage door open.


Decided to move the rear T piece to the other side of the mount to give a little more room when fitting the diff.


Onto the brake reservoir, really don't like the setup here and will probably change after the IVA.


My first rivnut fitted...  :)


Onto the fuel lines. The fuel lines seem harder to work with over the brake lines. I see most people use a braided hose instead of a copper lines, again might look at changing this down the line.


Started to clip down the brake lines as I was happy with how everything was going to go together.


Was a little concerned about the clearance under the diff so decided to fit it quickly just temporarily to check.

First help from Father today (well apart from driving me to get the kit), it's about time he turned up to lend a hand!!!


Loads of room!

Can crack on and secure these lines down now.


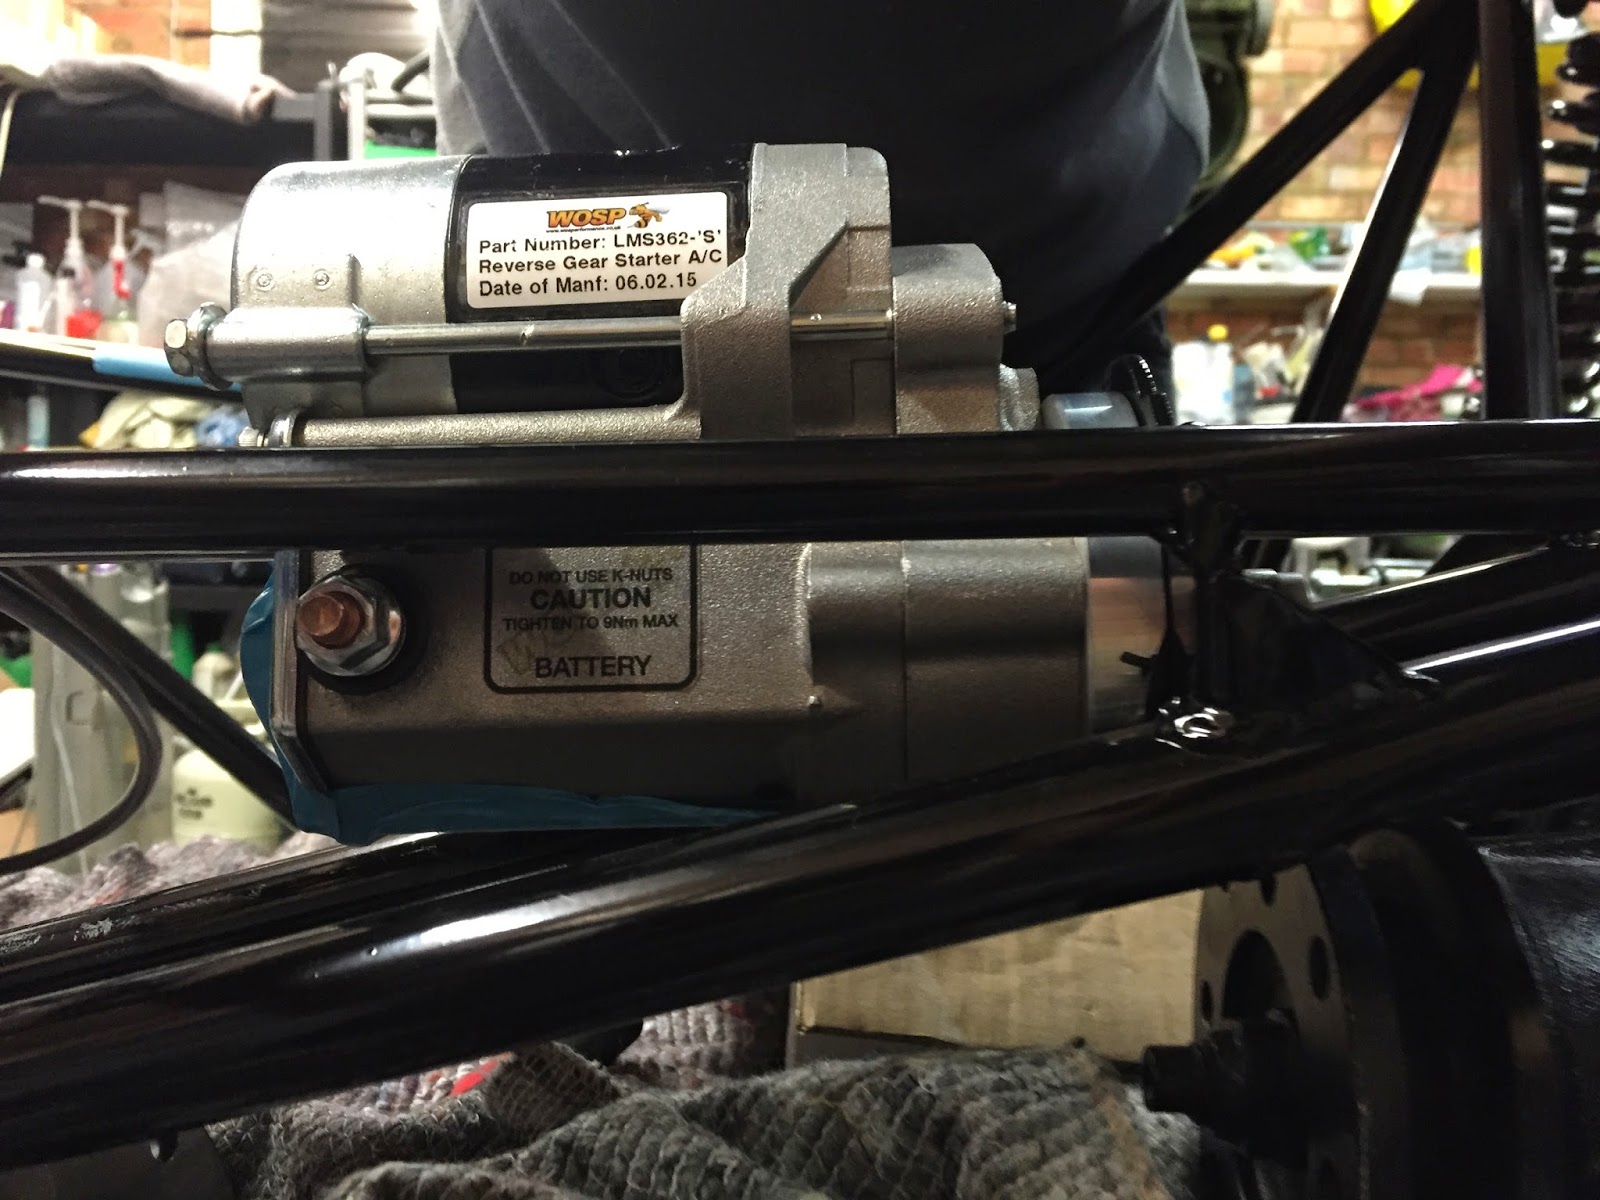
Got a little ahead of myself and decided to see how the electric reverse goes in. Its tight, really tight.


I will need to cut down this terminal to get it to fit correctly.


Its really tight this side also but fingers crossed this should be ok.


Diff came out ready for the brake and fuel lines to be finished off.  Will crack on tomorrow..